Best iPad Pro 1st, 9.7’’ replacement battery
Image

| Battery | Check Current Price |
|---|---|
| HDCKU A1664 Battery Replacement Kit for iPad Pro 9.7 inch | View On Amazon |
| Vvsialeek Replacement Battery for iPad Pro 9.7 | View On Amazon |
Replacing your iPad Pro (1st, 9.7’') battery is a smart move when it comes to elongating the life of your tablet. The iPad Pro (1st, 9.7’') is a great device that is flexible and offers ease whether for professional or personal use. Choose one of the replacement options available in the market since they are as good as the original battery your iPad Pro (1st, 9.7’’) comes with.
Here are some of the best options to pick from.
HDCKU A1664 Battery Replacement Kit for iPad Pro 9.7 inch
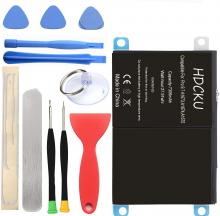
The HDCKU A1664 Battery Replacement Kit for Apple iPad Pro 9.7 inch is made using premium grade A+ quality cells. This durable and reliable Li-Polymer battery is brand new and comes with the required FCC, CE, and RoHS certifications.
It is a 7306mah replacement battery with a built-in special microchip that can prevent it from over-charging, over-heating, and short-circuiting. With this purchase, you will also get free repair tools to change the battery yourself.
Compatibility:
Apple iPad Pro 9.7 inch A1673 on the iPad Pro, A1674 or A1675 on the iPad Pro Wi-Fi + Cellular.
Vvsialeek Replacement Battery for iPad Pro 9.7
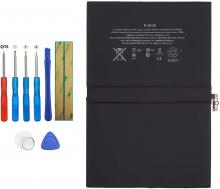
The Vvsialeek Replacement Battery Compatible with iPad Pro 9.7 comes with a capacity of 7306mAh and a voltage of 3.82V.
It is made to perfectly fit the model numbers A1673, A1674, and A1675 and comes with the required installation tools and adhesive tapes. This brand new battery is the perfect way to ensure you are using your tablet to its fullest and get the desired long battery life.
Compatibility:
Apple iPad Pro 9.7 2016 Edition Internal New A1673 A1674 A1675
How to replace the iPad Pro (1st, 9.7'') battery?
Step 1 -
Using the heat gun, heat up the outside perimeter of the touchscreen to soften the adhesive.
Step 2 -
Use the plastic opening tool on the touch screen edge and a suction cup to separate it from the bezel of the iPad. Wedge in a triangle opening tool in the separation so that the adhesive doesn't come back in contact with itself as you continue working on the touchscreen.
Step 3 -
Unscrew the three screws on the screen connector cover and disconnect them.
Step 4 -
Next, move to the screws on the mainboard cover and lift the cover from the bottom when they all are released.
Step 5 -
Heat the back of the battery to loosen it and remove the screws so you can lift up the battery little by little using a plastic tool.
Step 6 -
Remove the cover and disconnect the connector to raise the battery and mainboard together and finally remove the battery.
Step 7 -
Replace the battery and follow the steps in reverse order to put the iPad back together in working order.